Thursday, February 10, 2011

“Less than 24 Hours left to Save 25% on our Latest eBook” plus 1 more: Digital Photography School

“Less than 24 Hours left to Save 25% on our Latest eBook” plus 1 more: Digital Photography School

Link to Digital Photography School

Less than 24 Hours left to Save 25% on our Latest eBook

Posted: 09 Feb 2011 10:01 PM PST

It’s been just under 2 weeks since we launched our latest downloadable eBook – Photo Nuts and Shots.

As I mentioned last week – it’s been our fastest selling eBook yet with many thousands of our readers picking up a copy.

This post is just a short note to remind readers that we’ll be closing down the launch special of a 25% discount on Photo Nuts and Shots in just under 24 hours. The early bird discount will be over at midnight on Thursday at midnight (Eastern US time).

Last Chance to Win a Sony a55 and Lens

At the same time we will also be shutting down the competition to win a Sony a55 camera and 18-55mm lens which have been generously donated by our friends at Sony (Check out the a55 and the rest of Sony’s range of SLT and dSLRs here).

So don’t miss out – Order your copy and get immediate access to this downloadable eBook today.

Don’t forget – Like all DPS books you’re satisfaction is guaranteed with with Photo Nuts and Shots with a 60-day money back guarantee.

Post from: Digital Photography School - Photography Tips. Check out our resources on Portrait Photography Tips, Travel Photography Tips and Understanding Digital Cameras.

NYIP_DPschool468x60.jpeg

Less than 24 Hours left to Save 25% on our Latest eBook


5 Photo Items To Pack and 4 To Leave At Home For Your Next Family Vacation

Posted: 09 Feb 2011 05:59 AM PST

Copyright Michael Oh

For many of us vacations, or holidays, can be a stressful time, photographically speaking. The types of trips I’m talking about here are the ones flying to a location with solid photography potential and the whole family is in tow. These trips often call for a certain level of compromise on the part of any picture taking parent. Balancing the desire to grab my full photo kit and still manage to have enough room for all the family essentials. I have been on multiple trips with my nine year old daughter and I can attest to the learning curve and how the balance can change with every trip.

Not only is gear space and weight important, the shooting potential when on a family trip can often be limited, and for good reason. It’s not a solo trip where I get to decide when and where I travel, it’s a family trip and everyone’s needs and desires come into play. Finding that balance with family time and shooting time is way beyond the scope of this post, but I do hope to help you lighten your gear load by only packing what is truly needed given the compromising structure of any family vacation.

Items To Pack

Lenses

Bring, at most, two lenses. A telephoto zoom and a wide angle zoom are all that is needed. That 400mm monster? Leave it at home. Yes, you might miss out on some great birding photos, but if this is a family trip, it’s going to be about compromise. Maybe find a simple, easy lens for a trip like this. Remember that you may be handing the camera over to other family members, depending on age, to shoot some shots. Keep it simple and easy. An 18-200mm lens works well as an all around travel lens, for those with a 1.6x crop factor camera, and there are some quality options available for most any manufacturer. If you must bring multiple lenses, try to pack them in a bag that handle double duty for daily snacks and water when out and about during your daily excursions.

Polarizing Filter

If you were to bring just one filter on a trip, bring a polarization filter. From cutting down glare of the ocean waves to removing pesky reflections on buildings to increasing contrast and saturation in other situations, a polarization filter will serve you well. I would suggest keeping it in its original container (see below when you’re not bringing your full filter wallet) for protection.

UV/Haze Filter

Chances are you have one of these on your camera already. It will help protect your lens from spray and all that sand you’ll encounter while lounging on the beach.

Shot List

Many of us travel with a shot list, be it a prescribed list for any trip or something specific for the location of intent. The most important reason to have a shot list on a family trip is to share it with everyone. This serves three purposes: 1) It lets everyone know what is important for you to see on the trip. 2) It gives others a chance to offer input and make photography more fun for everyone (ask for suggestions to help everyone feel involved, especially if your kids have favorite things they like to have photos of) 3) It helps keep you sane and limited. Don’t make the list too gargantuan, keep it limited to the most important items so you don’t feel constantly torn between family time and shooting time.

Extra Cards

Don’t run out of space!! You’ve made your checklist in the item above, but did you include all the photos of your kids and spouse playing, goofing off and just generally being a family? Not only that, if you are like me, you may hand your camera over to get a kids perspective on the world and they will surely suck down a lot of card space. On top of that, with many cameras offering video, something you may use lightly or not at all when traveling and shooting solo, it can be a great way to bring back some fond memories. But video also chews up a great deal of space. Cards are light and relatively cheap these days, don’t be caught frantically deleting photos to make room! Your time is better spent enjoying your trip.

Items To Leave At Home (And Why)

Full Tripod

A full sized tripod is nice, but the bulk and weight can be a killer on a family trip. Sure there will be times when you may want to snap a family photo in front of a scenic spot, but there are other options to a space hogging Goliath of a tripod. For instance, I prefer to carry the Trek-Tech GO! Pro tripod. It is a bit of compromise in the batter of space and weight over solid stability, but it does get the job done well for this type of situation. And it can be used as a walking stick, handed over to one of your children as a handy means of distraction when the time is right. Not only that, it will fit in a carry-on bag, possibly saving you on checked baggage fees.

Every Strobe You Own

Unless there is a specific photo you know you want to capture that will require more than one strobe, leave the weight, and the batteries, at home. If your camera has a pop-up flash, you won’t need to bring an external strobe at all. I know it may be blasphemy to some, calling for a ban on external strobes, but the weight and space saved can make the trip more enjoyable for all. Depending on the size of the little ones, you may be over burdened with snacks, toys, books or other forms of entertainment, don’t add to the stress on your back by adding in unneeded weight.

Every Battery You Own (You Know, Just In Case)

Bring one battery for the camera and one spare. That’s all you will need, really. Bring the charger as well and give the day’s battery a charge every night, replacing it with the spare. If you burn through two batteries in a day, you might be shooting too much and spending too little time enjoying your family. Depending on trip length and your shooting habits, you may be able to simplify even further and bring only the batteries and no charger. Simple = easy = more enjoyable vacation.

All Your Other Filters

You have a fancy wallet with a ton of filters. Maybe you don’t think it’s a ton. Maybe it’s only 10 or so. If your significant other thinks it’s a ton, you might want to consider leaving the wallet at home. It’s bulk, it’s (minor) weight and it is one more thing to keep track of while juggling other family gear. Simplify. Did I mention that? See what you can shoot without the filters. Sure, there may be times when you lament not bringing them all, but this is a family trip and you family would certainly enjoy you spending more time with them than the filters. Ok, bring the graduated neutral density filter. Maybe you can’t live without that one.

————

My point is packing a minimal amount of photography gear will often have the biggest impact on fun for everyone.  I have over one it in the past, carried over 15lbs worth of gear and got so caught up in photos that everything else falls away.  I found this isn’t always the best way to handle a trip.

One last bit of advice: Schedule time to just shoot.  Work with your spouse and kids to have some time when you can get out, by yourself, and shoot until your heart is content.  If the pull of photography is too great, communicating about your desire for photography time alone can go a long way to smoothing the bumps any family can have while traveling.

Post from: Digital Photography School - Photography Tips. Check out our resources on Portrait Photography Tips, Travel Photography Tips and Understanding Digital Cameras.

NYIP_DPschool468x60.jpeg

5 Photo Items To Pack and 4 To Leave At Home For Your Next Family Vacation


Wednesday, February 9, 2011

“5 Situations When Manual Focus is Better than Auto Focus” plus 1 more: Digital Photography School

“5 Situations When Manual Focus is Better than Auto Focus” plus 1 more: Digital Photography School

Link to Digital Photography School

5 Situations When Manual Focus is Better than Auto Focus

Posted: 08 Feb 2011 11:01 AM PST

Manual-Focus-2Digital Cameras present photographers with an ever increasing array of Automatic and Semi Automatic shooting modes. Most of these center around different ways of exposing your shots – however many cameras also give options for different focusing modes (auto, continuous focusing for moving subjects and manual).

It’s no wonder then that many photographers never make use of their camera and lens’ ability to focus manually. In fact this week I spoke with one DSLR owner recently who hadn’t even noticed the manual/auto focus switch on the side of his lens.

Image by dsevilla

When is Manual Focus Better than Auto Focus?

Let me start by saying there is no right or wrong time to use either manual or auto focusing – both can produce great results in almost all circumstances – however there are a few times when you might find it easier to switch to manual focusing:

1. Macro Work

Manual-Focus-MacroWhen doing macro photography I almost exclusively switch to manual focusing.

The narrow depth of field in these shots mean that you need to be incredibly precise with focusing and being just a smidgeon out or having your camera choose to focus on the wrong part of your subject can completely ruin a shot.

To use it you’ll also probably want to use a tripod to eliminate any movement of the camera which can make focusing either in manual or auto mode frustrating.

Manual focusing puts the control completely in your hands when shooting in this very precise setting.

Image by maruchan313

2. Low Light

Manual-Focus-Low-LightShooting in dimly lit environments can be difficult for some cameras and lenses when it comes to focusing.

You’ll know when your camera is struggling in Auto mode when every time you go to take a shot the lens will whirl from one end of it’s focusing options to the other and back again before deciding on where to focus.

This can really lengthen your shooting process and make taking quick candid shots quite frustrating.

Switch to manual mode and you can quickly find your focusing point and get the shot you’re after.

Image by Jim Skea

3. Portraits

Manual-Focus-PortraitWhen shooting portraits focus needs to be precise.

The majority of your shots of people will need to have their eyes in perfect focus (although in the example to the left it’s the lips) and so switching to manual focus will give you complete control to enable this to save you from having to line up the focusing points on your camera on the eyes, press halfway down and then frame your shot.

Manual focusing in portrait work helps to ensure the viewer of the image is drawn to the part of the face that you want them to notice.

Image by Djof

4. Shooting Through Glass/Wire Fences

Manual-Focus-WindowIf you’ve ever shot through anything like a window or a mess/wire fence you’ll know how cameras will often get confused on where to focus your shot.

Whether it’s shooting out of a plane window, taking a shot of an image at a museum or photographing animals through fences at the zoo – you might find your camera is confused.

Manual focusing will avoid this completely and allow you to get things just right – focusing upon the subject behind that glass or fence. If you do this in conjunction with a large aperture (which decreases depth of field) and get in close to the fence or glass you might well eliminate it completely from being noticeable in your shot.

Image by Gregory Lee

5. Action Photography

Manual-Focus-SportShooting fast moving subjects (like racing cars, planes, bikes, running animals etc) can be a frustrating experience when shooting with auto focus.
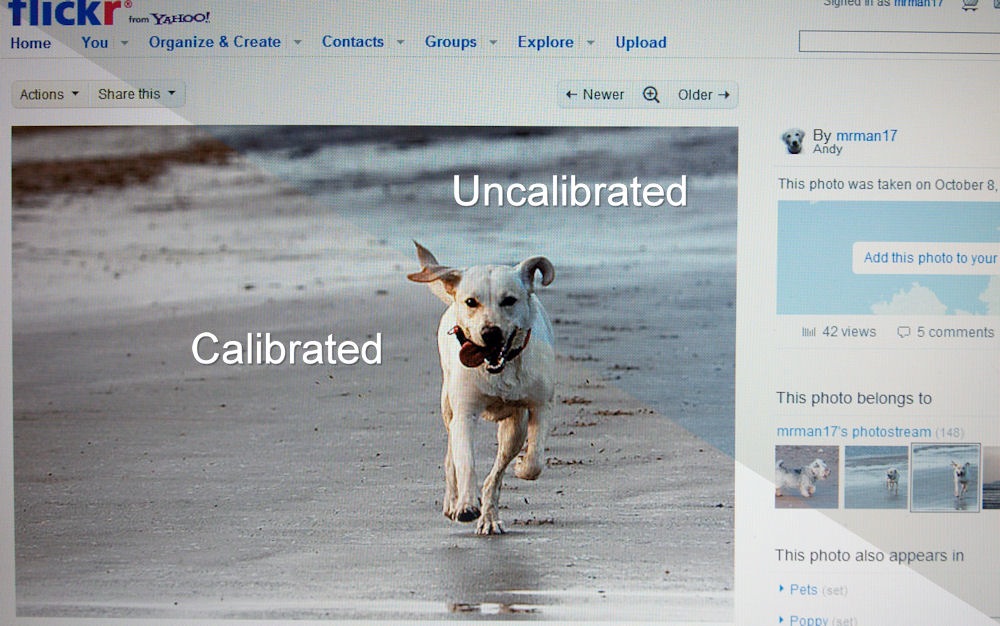
Even the continuous focusing modes can get left behind or confusing if you’re not panning with your subject smoothly.

One way to overcome this is to switch to manual focusing and pre focus on a point that the subject will move through – and shooting at that point. You need to get your timing just right – but you’ll find that it’ll often give better results than relying upon auto focus modes (particularly if you shoot in continuous shooting/burst mode).

Image by fensterbme

Homework

Shooting in manual focus mode is a skill that you need to learn and practice. While you will have more time to get it right when shooting still objects – it can become more difficult when shooting moving subjects – so practice.

This week set aside an hour or two with your camera to shoot only in manual focus mode. Practice on a variety of subjects including some moving ones. While your practice session might not produce great results the skill that you learn will be useful to have.

Post from: Digital Photography School - Photography Tips. Check out our resources on Portrait Photography Tips, Travel Photography Tips and Understanding Digital Cameras.

NYIP_DPschool468x60.jpeg

5 Situations When Manual Focus is Better than Auto Focus


How to Calibrate Your Monitor

Posted: 08 Feb 2011 05:09 AM PST

A Guest Post by Andrew Mills from Andrew Mills Photography.

Many of us spend a small fortune on our camera equipment trying to get the best quality we can, yet so many of us miss out on an important step that can make a huge difference to our photos.

That step is to calibrate your monitor. You can view the same image on the same computer, and just swap the monitor for another and that image will look different on each monitor you try (even monitors of the same brand and model may not be exactly the same).

As a result, you can’t be 100% sure that your images’ colour balance, hue, contrast and brightness are set correctly. You may be lucky in that your monitor is set up fairly well by default, but this can not be expected.

The image below is a photo of a section of my laptop screen (it is an actual photo, doing a screen grab won’t capture the effect the monitor has). Actually, it’s a composite of two photos – the upper right half is with no monitor profile, the lower left half is with the profile active. As you can see, by default, my laptop screen is a tad too dark and has a horrible blue cast – this is something I had not noticed until I had calibrated it.

Screen compare.jpg

If I edit an image, set its colour balance and brightness and contrast with the uncalibrated screen, I will be unwittingly compensating for that extra blue I see, so I will end up adding yellow, or taking blue away to make it look correct – this means that any resulting prints will have a yellow cast. You will then spend ages swearing at your printer, fiddling with its colour profiles and wasting loads of ink and paper (and money). If you’re lucky, some labs will colour correct images for you – but don’t expect professional labs to do so as they expect you to make sure it’s correct beforehand (unless you ask – they won’t change an image in case they "mess up" and intentional effect).

So, by calibrating your monitor, you are "standardising" it – any photo you edit on your calibrated monitor should look the same on any other calibrated monitor, and should also print with little or no adjustment, and it should come back from the lab and look as you expected.

So how do I calibrate my monitor?

Photoshop and Paint Shop Pro both have utilities built in where you can do a basic calibration. To be honest, in my experience they are next to useless (but possibly better than nothing). Look in your editing application’s manual to see if it has this built in, and how to use it.

The best option is to get a colorimeter – I use X-Rite’s (AKA GretagMacbeth) i1 (AKA Eye-One) display 2 (supports both PC and MAC), which looks a bit like a computer mouse. Once the software is installed, you plug the colorimeter into a USB slot, fire up the software and place the colorimeter on the screen.

Step 1:

You’ll be asked whether you want "Easy" or "Advanced" – most people will only need "Easy".

Screen cal step 1.jpg

Step 2:

You’ll be asked what sort of monitor you will be testing – you will have a choice of "LCD", "CRT" and "Laptop". Even though your laptop has an LCD screen, you still choose Laptop. Click the right arrow.

Screen cal step 2.jpg

Step 3:

Place the colorimeter onto the screen as shown. Click the right arrow.

Screen cal step 3.jpg

Step 4:

There’s no screen grab for this bit as this is where the software does its thing – it will "find" where the colorimeter is on the screen, then will display blocks of colour for the colorimeter to read and analyse. This will take a few minutes and you won’t be able to use the computer while it’s going on, so now’s your chance to go and have a cuppa.

Step 5:

The software takes the info from the colorimeter and builds a custom monitor profile that will be loaded at startup. You can change the name if you wish, but all you have to do now is click "Finish calibration" or the right arrow to save the new profile.

Screen cal step 4.jpg

And that’s it – the whole process only takes a few minutes and is well worth it. In most cases you will only need to do this once a month, so it’s not a great burden. Although, CRT users may want to calibrate their monitors more often as they tend to vary more with age and environment.

Windows Vista and colour profiles

There is a problem with colour management that affects some people, but not others, in Windows Vista and, it seems, still persists in Windows 7. On my desktop PC I don’t have any problems, but on my laptop the correct profile is not always loaded when it boots, and whenever the UAC requester pops up, the current colour profile is lost.

To counter this, I use LUT Manager to manually load the correct profile.

What else can I calibrate?

The particular model of colorimeter I have only does monitors, which will suffice for most people. But you can build calibration profiles for you camera, scanner and printer. I don’t know of many people who use calibration targets for their cameras and scanners (although there are people who do who need that level of consistency), but if you do a lot of your own printing, especially on non manufacturer specific papers (a HP printer will have its own profiles already included with the printer driver software for its range of papers), then you may benefit from building your own printer
calibration profiles for each paper type.

Read more from Andy at Andrew Mills Photography.

Post from: Digital Photography School - Photography Tips. Check out our resources on Portrait Photography Tips, Travel Photography Tips and Understanding Digital Cameras.

NYIP_DPschool468x60.jpeg

How to Calibrate Your Monitor


Tuesday, February 8, 2011

“How to Stay Motivated to Photograph Nature after Months in the Snow and Cold” plus 1 more: Digital Photography School

“How to Stay Motivated to Photograph Nature after Months in the Snow and Cold” plus 1 more: Digital Photography School

Link to Digital Photography School

How to Stay Motivated to Photograph Nature after Months in the Snow and Cold

Posted: 07 Feb 2011 10:54 AM PST

A Guest Post by Valerie Jardin.

I am a photographer. I love the outdoors and I live in the state of Minnesota. Even if you love snow and extreme temperatures, I can assure you that, by the end of January, you will be starved for some color in nature and less bulky clothing. Living in a ‘black and white’ landscape for several months every year makes you appreciate little things. As a photographer and nature lover you develop an eye for details. Here are a few tips to help you survive a long, cold and snowy winter while photographing nature.

First and foremost, be ready for extreme temperatures and wind chills before heading out into the woods. Hand and feet warmers and layers of clothing are common sense. Thin gloves under your heavy mittens so that you don’t get frostbites when you need to make camera adjustments are a good idea. Having a large plastic bag handy to seal your camera or your entire gear bag in before going back to room temperature will prevent heavy condensation on your precious equipment.

In the middle of winter, there will be a time when you find yourself in a creative rut, when you are going to get tired of photographing ‘Winter Wonderland’ however pretty it may look. You are starting to dream about grass, dirt, spring flowers and the return of the migratory birds. I usually reach that state of mind around mid January. So what do I do? I get out there with my camera and my snowshoes and I shoot.

What do I look for when out on a nature walk in January? I pay attention to details, patterns, the slightest bit of color, animal tracks, wildlife. Why not experiment with some black and white photography or use a creative effect lens such as the Lensbaby Composer? Here are a few examples of images I shot on some of the most dreary and cold days this winter, most of them within walking distance from my house:

The color of the blue spruce really stands out in the snow.

Look for interesting shapes, here the shadow and drift look like a giant spoon

Patterns in the snow

Snow covered fox tracks

Use a shallow depth of field to isolate a detail

Deer always look so beautiful in the snow. They are almost impossible to spot in the woods any other time of the year.

Experiment with black and white

Need a little creative boost? A special effect lens such as the Lensbaby Composer can be a really fun tool to look at nature differently

I hope you enjoyed this article. If you are located in a cold state or country, spring is coming… Happy winter shooting!

Connect with Valerie on Facebook or Twitter or visit her website.

Post from: Digital Photography School - Photography Tips. Check out our resources on Portrait Photography Tips, Travel Photography Tips and Understanding Digital Cameras.

How to Stay Motivated to Photograph Nature after Months in the Snow and Cold


onOne Perfect Photo Suite Review [Plus a $100 Discount]

Posted: 07 Feb 2011 05:01 AM PST

There are very few programs out there that truly have the ability to take your photography to the next level. onOne Perfect Photo Suite is a true game changer when it comes to digital photography, and this review will hopefully open your eyes to a world of possibilities for your images.

Perfect Photo Suite is made up of several different programs: FocalPoint, Mask Pro, Perfect Resize, PhotoFrame, PhotoTools and PhotoTune. Each program has distinct and unique features that will help in different situations, and each program is incredibly helpful for any photographers workflow. In this review, I will go over each product in the Perfect Photo Suite one by one, and give examples along the way to show actual results from my own images. I’ll also post some short videos to demo each program so you can see the workflow of each offering from this suite. This post is not a tutorial, just a review. It’s meant to give you a an idea of what this collection can do in the hands of any photographer.

FocalPoint

FocalPoint is a program designed to create realistic depth of field changes to your images, after the shot. This program can emulate the effects of a fast aperture lens, lens baby or even a tilt-shift lens. It can be used to selectively draw the viewers eye into a certain part of the image, while concealing or hiding distracting parts of the background or foreground. This program can also create or remove vignettes around the final image, and has a film grain feature to boot.

FocalPoint is incredibly easy to use, and it creates very professional results. onOne’s unique “Focus Bug” makes adjusting the outcome of the image incredibly fast and efficient. This is one of those programs that doesn’t really even need instructions, it’s very intuitive and easy to use right from the start.

So, is the “After” image better than the before? Well, that’s for you to decide! Is it different? Absolutely! Sure I could pull off similar effects in photoshop with gaussian blur layers and brushed-in vignettes, but that takes a lot more time than this. Like I said before, using FocalPoint is incredibly fast and efficient, and that’s the main reason behind purchasing plugins like this. Here’s a quick video demo of how FocalPoint works…

Mask Pro

Mask Pro is a little bit different in terms of ease of use; I’d definitely recommend watching the convenient little tutorial videos that onOne provides with each program. If you know Photoshop, then hopefully you are very familiar with masking. If not, masking is a process in Photoshop that can be used to remove unwanted parts or reveal wanted parts of an image using layers. Mask Pro is a program that is mainly used to remove objects like people from backgrounds so that you can replace the background with something else (for example, removing a person from a white backdrop and replacing the background with a graphic). Masking in Photoshop can be efficient at times, but there are also times when it can become a bit complicated. Photoshop’s “color range” feature can sample certain colors and remove them from the image, but the changes are global across the entire image and it can get a bit tricky at times to go back and correct the problems that it causes.

Mask Pro uses a unique feature where you sample color along the edge of your subject and choose whether to keep or discard that specific color. Once you have all your colors selected, you grab a “magic” brush and simply paint over the edge of the subject, creating a transparent background where it should be and retaining the subject along the way.

Mask Pro did an incredible job of removing this flower from the image. The lines and edges are clean and smooth, and the entire process was simple and actually kind of fun! It’s important to note that this was a somewhat simple object to remove. There will certainly be some subjects that are harder to remove from others, like a person with brown hair against a brown colored background. Not all images are good candidates for software programs like this. Here’s a quick video of the process I took to remove the flower from the background.

Perfect Resize

OnOne used to have an incredible program called Genuine Fractals. They have now taken the algorithms from that program and added them to Perfect Resize 7! How cool is that!? Perfect Resize is an absolutely phenomenal program that will actually take an image and make it larger, while preserving the details of the original file. If your image is 15×10 and your client wants a 30×20, you can simply plug the new dimensions into Perfect Resize and the program will increase the size of your image to match the new dimensions.

As you can see, I made this image significantly larger using Perfect Resize. The original image was about 11×7 inches, and Perfect Resize increased the size to 18×12 inches. This software is a must for anyone who wants to have larger prints made than what you normally would. The original file here was smaller than what my camera normally produces because I cropped out a good deal of the original file to create the composition. I used Perfect Resize to basically take my image back to its normal size. Here is a quick demo of how this program works…

PhotoFrame

PhotoFrame is one of those programs that is deceptively awesome. At first glance, I always thought that PhotoFrame was just good for adding a pre-made border around an image to make it look nice. Upon further inspection however, I discovered PhotoFrame is another incredibly powerful tool in the Perfect Photo Suite that definitely earned its spot in the line up. You can use PhotoFrame to create entire albums for clients, for anything from weddings to seniors. All in addition to the seemingly endless library of borders, textures and frames.

There is really no way to sum up the possibilites of PhotoFrame in a short review like this. The amount of textures, borders, frames and layouts in PhotoFrame is overwhelming to say the least. You can literally spend hours getting acquainted with all the possibilites. For the example image, I chose a senior themed layout because my subject was…well…a senior. Here’s a quick video to show the program in action…

PhotoTools

Aperture and Lightroom are incredibly powerful tools for any photographer. Now with the release of Aperture 3, both programs offer the ability to add filters to your images. These preset adjustments can range anywhere from simple black and white conversions, to lomo and antique feels, to super-modern over-saturated effects. The only problem with these filters is that you can’t combine them with each other or mask certain parts out.

Well, that’s not the case with PhotoTools. PhotoTools is a massive library of photographic filters and presets that give your images that extra pop they need to stand out. The revolutionary thing about PhotoTools is that you can stack these filters on top of one another, then adjust the opacity of each filter to taste before applying and exporting to your actual image. On top of that, most of these effects were created by top photographer in the industry, and they are available for use to anybody with the program! In this new version, there’s also a new blemish removal tool for portrait photographers, brand new effects specifically for HDR photography and dozens of new textures and effects.

In this example, I used an HDR image to show the powerful new HDR presets included in PhotoTools 2.6. These presets are a lot of fun to use, and mixing them together in your own way is even more fun. Here’s a quick video to show my workflow to produce this image…

PhotoTune

Last in the Perfect Photo Suite line up is PhotoTune, a powerful color correction program for all photographers, from landscape to portraits. PhotoTune has a powerful dynamic range enhancement feature to make images appear closer to how the human eye sees things (sort of like HDR), it features an incredible skin tune feature to color correct skin tones and make them look healthy and full of life, and it even has a helpful wizard style walkthrough option to help those who aren’t yet comfortable with PhotoTune’s “Pro” mode. PhotoTune also shines in it’s ability to remove color casts from images that sometimes go unnoticed. While this program is incredibly powerful, I can’t say that I will use it terribly often. If I’m working in Aperture, I like to work fast and efficient. Aperture does a great job of color correction on its own, and there are only rare cases where I need additional help from an outside program. However, there are plenty of times where I get a photo to where I think I want it, only to decide later that something just isn’t right. In those times, I will definitely reach for PhotoTune to see if I can fix the problem.

In the above example, my original image was missing warmth and life in the skin tones and color. PhotoTune did an incredible job of correcting this issue. Join me in this last demo video as I go through each step in a typical PhotoTune workflow for this type of image…

Conclusion

OnOne’s Perfect Photo Suite is an incredible collection of powerful tools for photographers. Some of the programs you will use all the time, while others are always there in a pinch when needed. The Perfect Photo Suite is sure to set your work apart from the crowd and give your images that wow effect that we all look for. The great thing about onOne is that when you purchase a software program from them, you get full access to their onOne University; an online collection of training videos by industry professionals. They also hold regular online webinars where pro photographers walk you through typical workflows using onOne software, and give inspiration for different styles and techniques in the world of photography.

Trial it for Yourself and Get a $100 Discount

Feel free to put the onOne Perfect Photo Suite through your own testing with a free 30-Day Trial of the entire lineup of programs. When you’re ready to make your purchase (but for the next two weeks only), be sure to use the coupon code “DPSPS” for an exclusive DPS discount of $100 off the suite. Just note that the trial is 30 days but the discount only lasts for two weeks from today and ends on 21 February 2011.

Be sure to follow me on twitter (@jamesdbrandon) if you don’t already. I’m always available to answer questions you may have regarding any posts that you read here!

Finally, we want to see your results from the Perfect Photo Suite! Leave us some comments below showing some of your best work that you’ve created thanks to this awesome software! Cheers, and happy shooting!

Post from: Digital Photography School - Photography Tips. Check out our resources on Portrait Photography Tips, Travel Photography Tips and Understanding Digital Cameras.

onOne Perfect Photo Suite Review [Plus a $100 Discount]