“5 Situations When Manual Focus is Better than Auto Focus” plus 1 more: Digital Photography School |  |

| 5 Situations When Manual Focus is Better than Auto Focus Posted: 08 Feb 2011 11:01 AM PST
It’s no wonder then that many photographers never make use of their camera and lens’ ability to focus manually. In fact this week I spoke with one DSLR owner recently who hadn’t even noticed the manual/auto focus switch on the side of his lens. Image by dsevilla When is Manual Focus Better than Auto Focus?Let me start by saying there is no right or wrong time to use either manual or auto focusing – both can produce great results in almost all circumstances – however there are a few times when you might find it easier to switch to manual focusing: 1. Macro Work
The narrow depth of field in these shots mean that you need to be incredibly precise with focusing and being just a smidgeon out or having your camera choose to focus on the wrong part of your subject can completely ruin a shot. To use it you’ll also probably want to use a tripod to eliminate any movement of the camera which can make focusing either in manual or auto mode frustrating. Manual focusing puts the control completely in your hands when shooting in this very precise setting. Image by maruchan313 2. Low Light
You’ll know when your camera is struggling in Auto mode when every time you go to take a shot the lens will whirl from one end of it’s focusing options to the other and back again before deciding on where to focus. This can really lengthen your shooting process and make taking quick candid shots quite frustrating. Switch to manual mode and you can quickly find your focusing point and get the shot you’re after. Image by Jim Skea 3. Portraits
The majority of your shots of people will need to have their eyes in perfect focus (although in the example to the left it’s the lips) and so switching to manual focus will give you complete control to enable this to save you from having to line up the focusing points on your camera on the eyes, press halfway down and then frame your shot. Manual focusing in portrait work helps to ensure the viewer of the image is drawn to the part of the face that you want them to notice. Image by Djof 4. Shooting Through Glass/Wire Fences
Whether it’s shooting out of a plane window, taking a shot of an image at a museum or photographing animals through fences at the zoo – you might find your camera is confused. Manual focusing will avoid this completely and allow you to get things just right – focusing upon the subject behind that glass or fence. If you do this in conjunction with a large aperture (which decreases depth of field) and get in close to the fence or glass you might well eliminate it completely from being noticeable in your shot. Image by Gregory Lee 5. Action Photography
Even the continuous focusing modes can get left behind or confusing if you’re not panning with your subject smoothly. One way to overcome this is to switch to manual focusing and pre focus on a point that the subject will move through – and shooting at that point. You need to get your timing just right – but you’ll find that it’ll often give better results than relying upon auto focus modes (particularly if you shoot in continuous shooting/burst mode). Image by fensterbme HomeworkShooting in manual focus mode is a skill that you need to learn and practice. While you will have more time to get it right when shooting still objects – it can become more difficult when shooting moving subjects – so practice. This week set aside an hour or two with your camera to shoot only in manual focus mode. Practice on a variety of subjects including some moving ones. While your practice session might not produce great results the skill that you learn will be useful to have. Post from: Digital Photography School - Photography Tips. Check out our resources on Portrait Photography Tips, Travel Photography Tips and Understanding Digital Cameras. 5 Situations When Manual Focus is Better than Auto Focus
    |
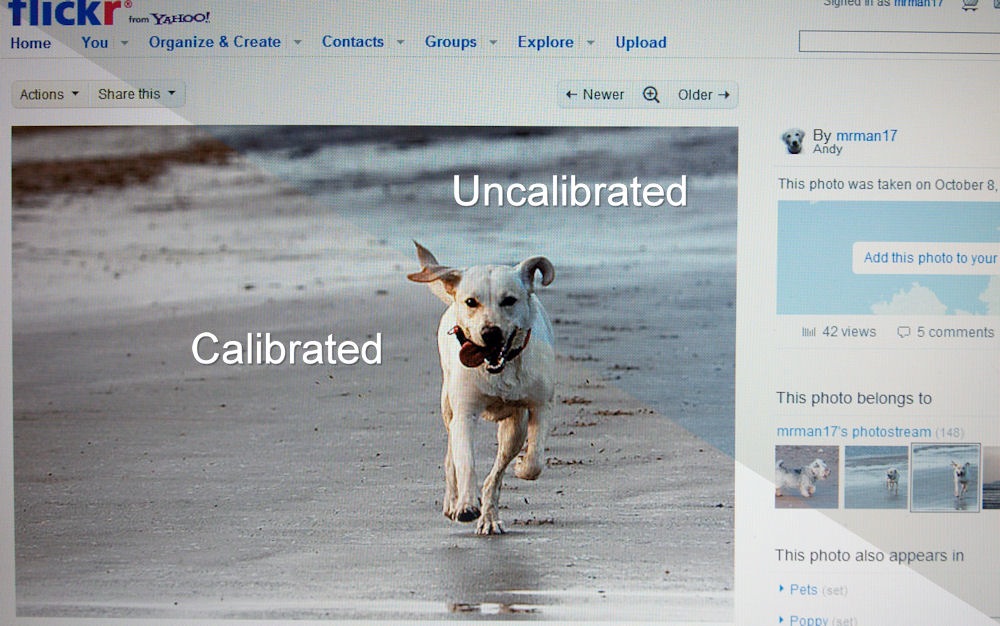
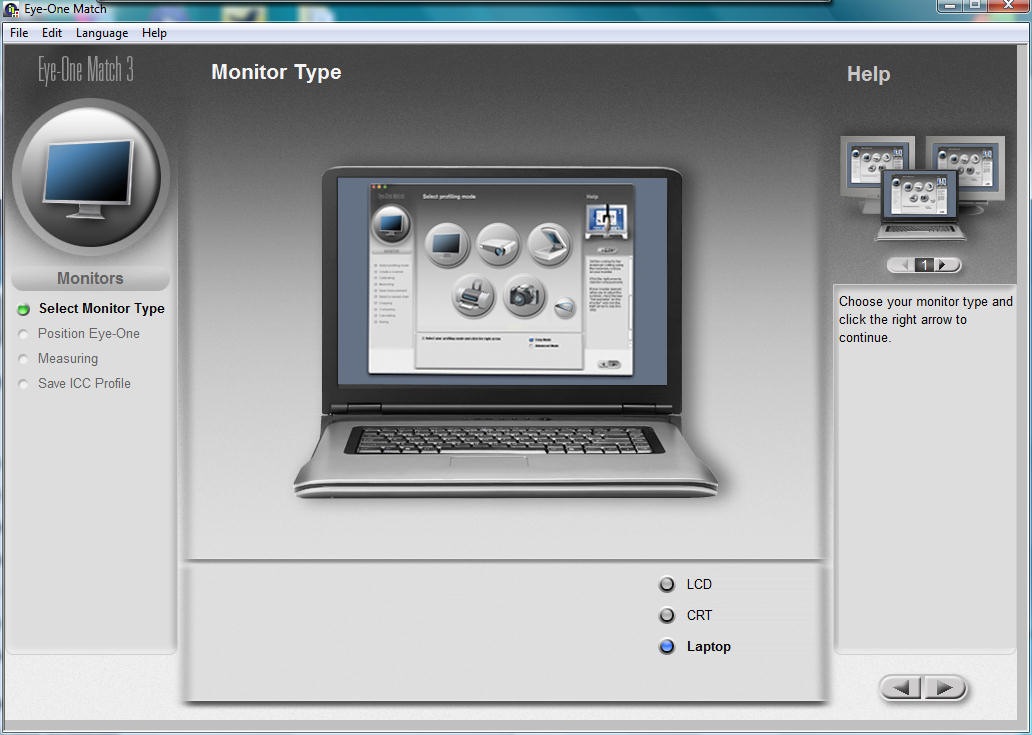
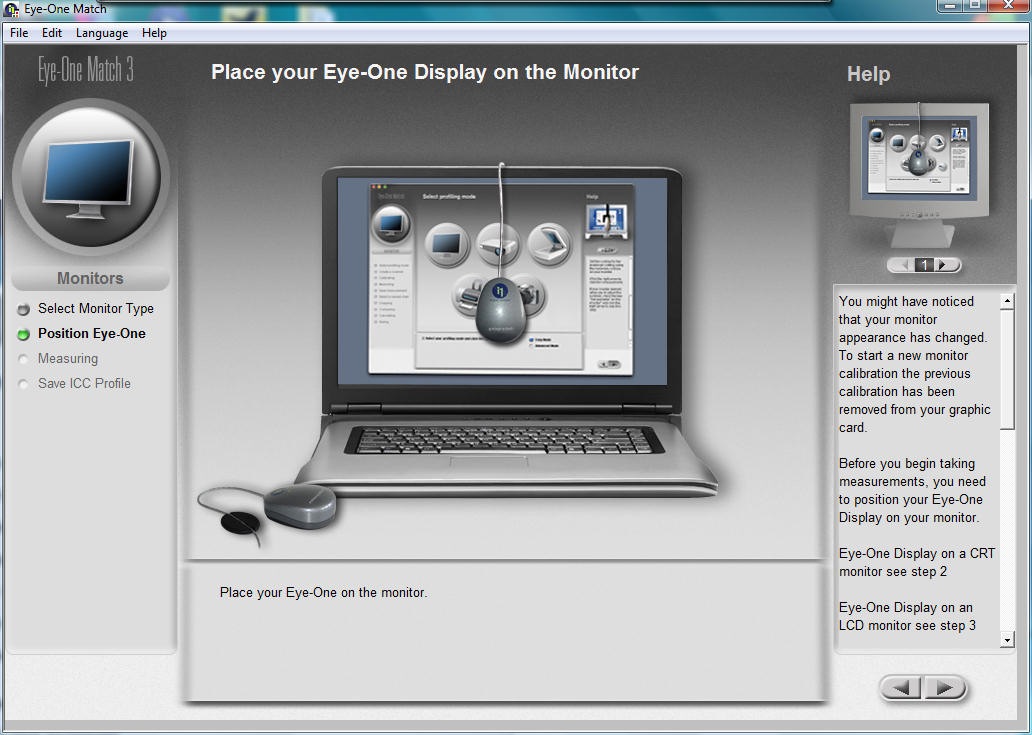
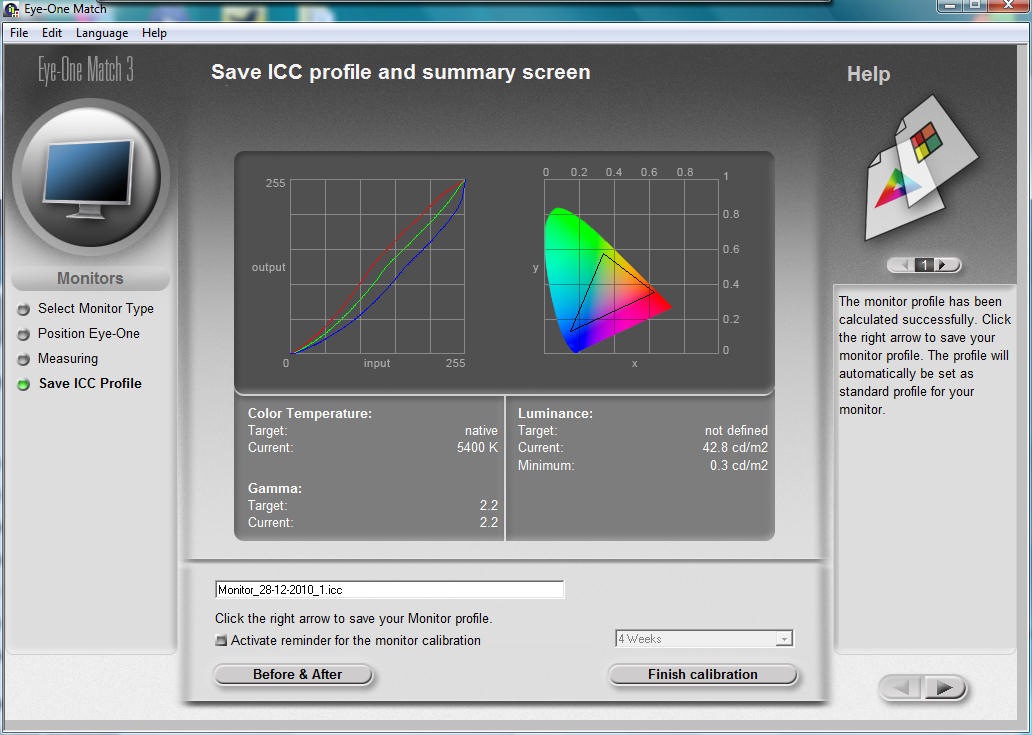
| Posted: 08 Feb 2011 05:09 AM PST A Guest Post by Andrew Mills from Andrew Mills Photography. That step is to calibrate your monitor. You can view the same image on the same computer, and just swap the monitor for another and that image will look different on each monitor you try (even monitors of the same brand and model may not be exactly the same). As a result, you can’t be 100% sure that your images’ colour balance, hue, contrast and brightness are set correctly. You may be lucky in that your monitor is set up fairly well by default, but this can not be expected. The image below is a photo of a section of my laptop screen (it is an actual photo, doing a screen grab won’t capture the effect the monitor has). Actually, it’s a composite of two photos – the upper right half is with no monitor profile, the lower left half is with the profile active. As you can see, by default, my laptop screen is a tad too dark and has a horrible blue cast – this is something I had not noticed until I had calibrated it. If I edit an image, set its colour balance and brightness and contrast with the uncalibrated screen, I will be unwittingly compensating for that extra blue I see, so I will end up adding yellow, or taking blue away to make it look correct – this means that any resulting prints will have a yellow cast. You will then spend ages swearing at your printer, fiddling with its colour profiles and wasting loads of ink and paper (and money). If you’re lucky, some labs will colour correct images for you – but don’t expect professional labs to do so as they expect you to make sure it’s correct beforehand (unless you ask – they won’t change an image in case they "mess up" and intentional effect). So, by calibrating your monitor, you are "standardising" it – any photo you edit on your calibrated monitor should look the same on any other calibrated monitor, and should also print with little or no adjustment, and it should come back from the lab and look as you expected. So how do I calibrate my monitor?Photoshop and Paint Shop Pro both have utilities built in where you can do a basic calibration. To be honest, in my experience they are next to useless (but possibly better than nothing). Look in your editing application’s manual to see if it has this built in, and how to use it. The best option is to get a colorimeter – I use X-Rite’s (AKA GretagMacbeth) i1 (AKA Eye-One) display 2 (supports both PC and MAC), which looks a bit like a computer mouse. Once the software is installed, you plug the colorimeter into a USB slot, fire up the software and place the colorimeter on the screen. Step 1:You’ll be asked whether you want "Easy" or "Advanced" – most people will only need "Easy". Step 2:You’ll be asked what sort of monitor you will be testing – you will have a choice of "LCD", "CRT" and "Laptop". Even though your laptop has an LCD screen, you still choose Laptop. Click the right arrow. Step 3:Place the colorimeter onto the screen as shown. Click the right arrow. Step 4:There’s no screen grab for this bit as this is where the software does its thing – it will "find" where the colorimeter is on the screen, then will display blocks of colour for the colorimeter to read and analyse. This will take a few minutes and you won’t be able to use the computer while it’s going on, so now’s your chance to go and have a cuppa. Step 5:The software takes the info from the colorimeter and builds a custom monitor profile that will be loaded at startup. You can change the name if you wish, but all you have to do now is click "Finish calibration" or the right arrow to save the new profile. And that’s it – the whole process only takes a few minutes and is well worth it. In most cases you will only need to do this once a month, so it’s not a great burden. Although, CRT users may want to calibrate their monitors more often as they tend to vary more with age and environment. Windows Vista and colour profilesThere is a problem with colour management that affects some people, but not others, in Windows Vista and, it seems, still persists in Windows 7. On my desktop PC I don’t have any problems, but on my laptop the correct profile is not always loaded when it boots, and whenever the UAC requester pops up, the current colour profile is lost. To counter this, I use LUT Manager to manually load the correct profile. What else can I calibrate?The particular model of colorimeter I have only does monitors, which will suffice for most people. But you can build calibration profiles for you camera, scanner and printer. I don’t know of many people who use calibration targets for their cameras and scanners (although there are people who do who need that level of consistency), but if you do a lot of your own printing, especially on non manufacturer specific papers (a HP printer will have its own profiles already included with the printer driver software for its range of papers), then you may benefit from building your own printer Read more from Andy at Andrew Mills Photography. Post from: Digital Photography School - Photography Tips. Check out our resources on Portrait Photography Tips, Travel Photography Tips and Understanding Digital Cameras.
  |
 Digital Cameras present photographers with an ever increasing array of Automatic and Semi Automatic shooting modes. Most of these center around different ways of exposing your shots – however many cameras also give options for different focusing modes (auto, continuous focusing for moving subjects and manual).
  When doing macro photography I almost exclusively switch to manual focusing.
  Shooting in dimly lit environments can be difficult for some cameras and lenses when it comes to focusing.
  When shooting portraits focus needs to be precise.
  If you’ve ever shot through anything like a window or a mess/wire fence you’ll know how cameras will often get confused on where to focus your shot.
  Shooting fast moving subjects (like racing cars, planes, bikes, running animals etc) can be a frustrating experience when shooting with auto focus.

| You are subscribed to email updates from Digital Photography School To stop receiving these emails, you may unsubscribe now. | Email delivery powered by Google |
| Google Inc., 20 West Kinzie, Chicago IL USA 60610 | |